Vue3、Vite5、Primevue、Oxlint、Husky9 简单快速搭建最新的Web项目模板
特色
-
📦 组件自动化引入
-
🌈 Primevue - Vue.js UI 套件,提高开发效率
-
🎨 UnoCSS - 高性能且极具灵活性的即时原子化 CSS 引擎
-
🔥 使用 新的
<script setup>语法 -
📥 API 自动加载 - 直接使用 Composition API 无需引入
-
🌍 API 采用模块化自动导入方式 根据demo.js文件设置接口,以API_xxx_method的方式命名,在请求时无需导入 直接使用useRequest()函数返回参数以解构的方式获取,拿到即为写入的接口
-
🐶 husky + lint-staged - Git提交自动检测格式化代码,解放双手
-
🎢 无TS,释放你的野性
进入正题
node版本必须是 >=18.18.0
创建基础模板
pnpm create vite my-vue-app --template vue
详细请看➡️cn.vitejs.dev/guide/#scaf…
得到以下目录结构⬇️
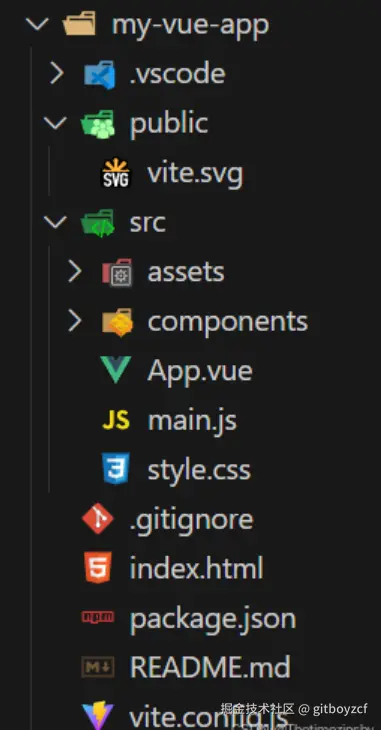
配置API自动化导入
安装依赖
pnpm i unplugin-auto-import -D
在vite.config.js中配置
import { defineConfig } from 'vite'
import vue from '@vitejs/plugin-vue'
import AutoImport from 'unplugin-auto-import/vite'
export default defineConfig({
plugins: [
vue(),
AutoImport({
imports: [
'vue',
'vue-router',
'pinia',
'@vueuse/core',
],
eslintrc: {
enabled: true,
filepath: './.eslintrc-auto-import.json',
globalsPropValue: true
}
}),
],
})
此时在App.vue中不用引入直接可以使用Vue的api
<script setup>
const title = ref('Hello World!')
</script>
配置组件自动化导入
安装依赖
pnpm i unplugin-vue-components -D
在vite.config.js中配置
import { defineConfig } from 'vite'
import vue from '@vitejs/plugin-vue'
import Components from 'unplugin-vue-components/vite'
export default defineConfig({
plugins: [
vue(),
Components({
dirs: ['src/components'],
dts: false,
resolvers: [],
include: [/\.vue$/, /\.vue\?vue/, /\.jsx$/]
}),
],
})
src/components下新建 的组件 ,此时在App.vue中不用引入直接可以使用
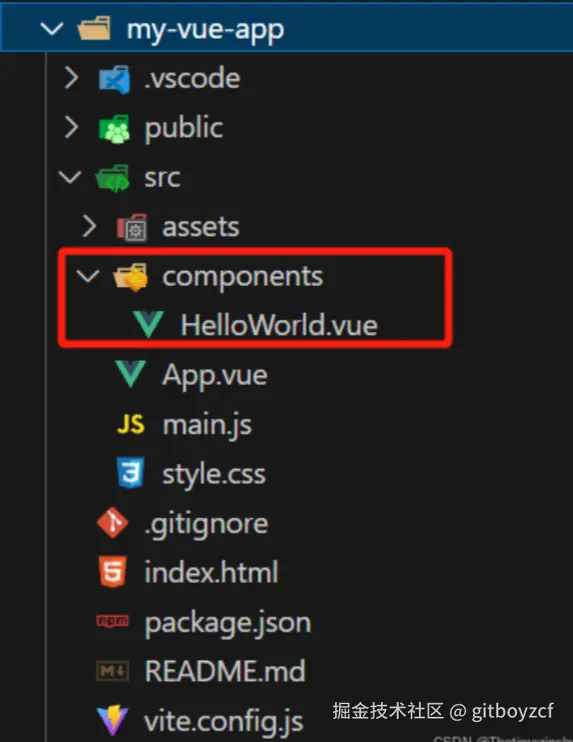
<template>
<div>
<HelloWorld msg="Hello Vue 3.0 + Vite" />
</div>
</template>
<script setup></script>
配置UnoCss
安装依赖
pnpm i unocss -D
直接插入以下代码⬇️(没有对应文件的自行创建)
unocss.config.js
import {
defineConfig,
presetAttributify,
presetIcons,
presetTypography,
presetUno,
presetWebFonts,
transformerDirectives,
transformerVariantGroup
} from 'unocss'
export default defineConfig({
shortcuts: [
],
theme: {
colors: {
}
},
presets: [
presetUno(),
presetAttributify(),
presetIcons(),
presetTypography(),
presetWebFonts({
fonts: {
}
})
],
transformers: [transformerDirectives(), transformerVariantGroup()]
})
在main.js中引入样式
import { createApp } from 'vue'
import App from './App.vue'
import './style.css'
import 'virtual:uno.css'
async function bootstrap() {
const app = createApp(App)
app.mount('#app')
}
bootstrap()
在vite.config.js中配置
import { defineConfig } from 'vite'
import vue from '@vitejs/plugin-vue'
import Unocss from 'unocss/vite'
export default defineConfig({
plugins: [
vue(),
Unocss({}),
],
})
接入Primevue
安装依赖
pnpm add primevue @primevue/themes
在main.js中配置
import { createApp } from 'vue'
import App from './App.vue'
import PrimeVue from 'primevue/config'
import Nora from '@primevue/themes/nora'
import './style.css'
import 'virtual:uno.css'
async function bootstrap() {
const app = createApp(App)
app.use(PrimeVue, {
theme: {
preset: Nora
}
})
app.mount('#app')
}
bootstrap()
在vite.config.js中配置组件自动导入
import { defineConfig } from 'vite'
import vue from '@vitejs/plugin-vue'
import Components from 'unplugin-vue-components/vite'
import { PrimeVueResolver } from '@primevue/auto-import-resolver'
export default defineConfig({
plugins: [
vue(),
Components({
dirs: ['src/components'],
dts: false,
resolvers: [PrimeVueResolver()],
include: [/\.vue$/, /\.vue\?vue/, /\.jsx$/]
}),
],
})
此时在App.vue中不用引入直接可以使用
<div class="card flex justify-center flex-wrap gap-4">
<Button label="Primary" />
<Button label="Secondary" severity="secondary" />
<Button label="Success" severity="success" />
<Button label="Info" severity="info" />
<Button label="Warn" severity="warn" />
<Button label="Help" severity="help" />
<Button label="Danger" severity="danger" />
<Button label="Contrast" severity="contrast" />
</div>

更多组件请看➡️ primevue.org/button/
接入VueRouter4
安装依赖
pnpm i vue-router@4
创建以下文件夹以及文件
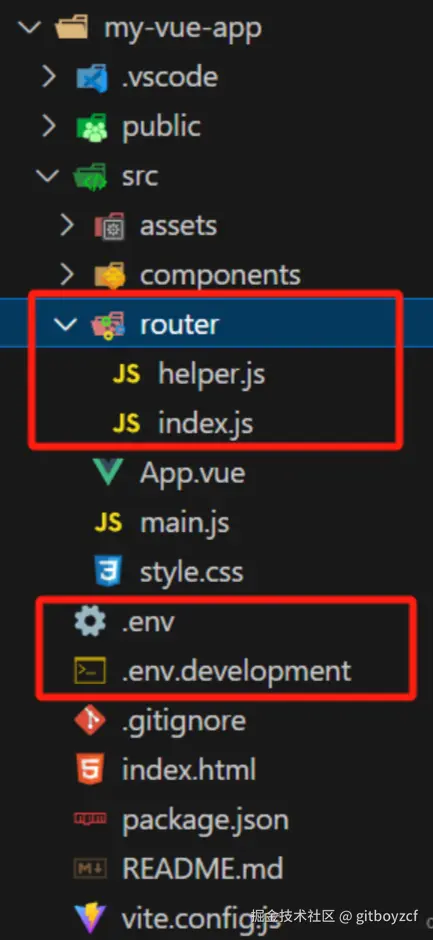
直接插入以下代码⬇️
helper.js
* 设置页面标题
* @param {Object} to 路由对象
*/
export const usePageTitle = (to) => {
const projectTitle = import.meta.env.VITE_APP_TITLE
const rawTitle = normalizeTitle(to.meta.title)
const title = useTitle()
title.value = rawTitle ? `${projectTitle} | ${rawTitle}` : projectTitle
function normalizeTitle(raw) {
return typeof raw === 'function' ? raw() : raw
}
}
index.js
import { createRouter, createWebHashHistory } from 'vue-router'
import { usePageTitle } from './helper'
const router = createRouter({
history: createWebHashHistory(import.meta.env.BASE_URL),
routes: [
{
path: '/',
name: 'Test',
component: () => import('@/views/demo/index.vue'),
meta: {
title: '测试'
}
},
{
path: '/:pathMatch(.*)*',
component: () => import('@/views/system/404/404.vue'),
meta: {
title: '找不到页面'
}
}
]
})
router.beforeEach((to, from, next) => {
usePageTitle(to)
next()
})
async function setupRouter(app) {
app.use(router)
}
export { setupRouter }
配置项目全局环境变量
具体请看 ➡️vite.dev/guide/env-a…
.env
VITE_APP_TITLE = 演示项目
VITE_APP_PREFIX = demo
VITE_APP_API_BASEURL = /
.env.development
VITE_APP_TITLE = 演示项目
VITE_APP_PREFIX = demo
VITE_APP_API_BASEURL = /
在main.js中引入
import { createApp } from 'vue'
import App from './App.vue'
import PrimeVue from 'primevue/config'
import Nora from '@primevue/themes/nora'
import { setupRouter } from './router'
import './style.css'
import 'virtual:uno.css'
async function bootstrap() {
const app = createApp(App)
app.use(PrimeVue, {
theme: {
preset: Nora
}
})
await setupRouter(app)
app.mount('#app')
}
bootstrap()
封装Axios
Vite4、Vue3、Axios 针对请求模块化封装搭配自动化导入(简单易用)
接入Pinia状态管理
安装依赖
pnpm i pinia
创建以下文件夹以及文件
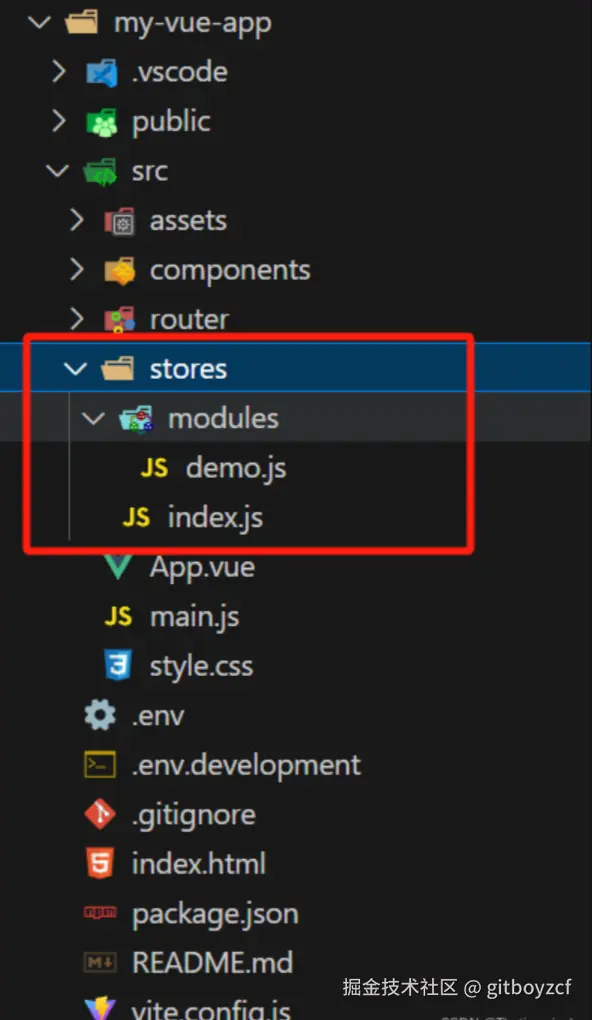
直接插入以下代码⬇️
index.js
import { createPinia } from 'pinia'
export const piniaStore = createPinia()
export function setupStore(app) {
app.use(piniaStore)
}
demo.js
import { piniaStore } from '@/stores'
export const useCounterStore = defineStore('counter', () => {
const count = ref(0)
const doubleCount = computed(() => count.value * 2)
function increment() {
count.value++
}
return { count, doubleCount, increment }
})
export function useOutsideCounterStore() {
return useCounterStore(piniaStore)
}
接入Prerttier + OXLint + ESLint
安装依赖
pnpm i oxlint prettier eslint-plugin-oxlint eslint-plugin-prettier -D
安装并配置ESLint
pnpm create @eslint/config@latest
根据响应提示选择,以下是我的选择⬇️
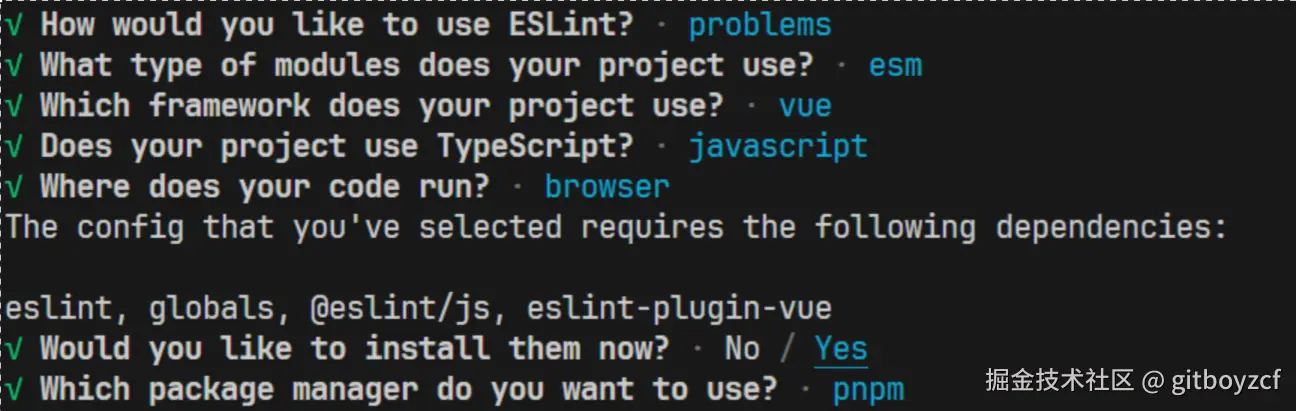
执行完后会自动创建eslint.config.js配置文件,以及对应依赖包🤩
直接插入以下代码⬇️(没有对应文件的自行创建)
eslint.config.js
import path from 'path'
import globals from 'globals'
import pluginJs from '@eslint/js'
import pluginVue from 'eslint-plugin-vue'
import VueEslintParser from 'vue-eslint-parser'
import prettier from 'eslint-plugin-prettier'
import oxlint from 'eslint-plugin-oxlint'
import { FlatCompat } from '@eslint/eslintrc'
import { fileURLToPath } from 'url'
const __filename = fileURLToPath(import.meta.url)
const __dirname = path.dirname(__filename)
const compat = new FlatCompat({
baseDirectory: __dirname
})
export default [
{
files: ['**/*.{js,mjs,cjs,vue}']
},
{
languageOptions: {
globals: {
...globals.browser,
...globals.node
},
parser: VueEslintParser
}
},
pluginJs.configs.recommended,
...pluginVue.configs['flat/essential'],
...compat.extends('./.eslintrc-auto-import.json'),
oxlint.configs['flat/recommended'],
{
rules: {
'no-var': 'error',
'no-multiple-empty-lines': ['warn', { max: 1 }],
'no-unexpected-multiline': 'error',
'no-useless-escape': 'off',
'vue/multi-word-component-names': 0
}
},
* prettier 配置
* 会合并根目录下的prettier.config.js 文件
* @see https://prettier.io/docs/en/options
* https://github.com/prettier/eslint-plugin-prettier/issues/634
*/
{
plugins: {
prettier
},
rules: {
...prettier.configs.recommended.rules
}
},
{
ignores: [
'**/dist',
'./src/main.ts',
'.vscode',
'.idea',
'*.sh',
'**/node_modules',
'*.md',
'*.woff',
'*.woff',
'*.ttf',
'yarn.lock',
'package-lock.json',
'/public',
'/docs',
'**/output',
'.husky',
'.local',
'/bin',
'Dockerfile'
]
}
]
prettier.config.js
export default {
printWidth: 100,
tabWidth: 2,
useTabs: false,
semi: false,
vueIndentScriptAndStyle: true,
singleQuote: true,
quoteProps: 'as-needed',
trailingComma: 'none',
jsxSingleQuote: true,
bracketSpacing: true,
proseWrap: 'never',
htmlWhitespaceSensitivity: 'strict',
endOfLine: 'auto'
}
.editorconfig
root = true
[*]
charset = utf-8
indent_style = space
indent_size = 2
end_of_line = lf
insert_final_newline = true
trim_trailing_whitespace = true
[*.md]
trim_trailing_whitespace = false
配置package.json文件
"scripts": {
"dev": "vite --host",
"build": "vite build",
"preview": "vite preview",
"lint": "oxlint && eslint",
"lint:fix": "oxlint --fix && eslint --fix"
},
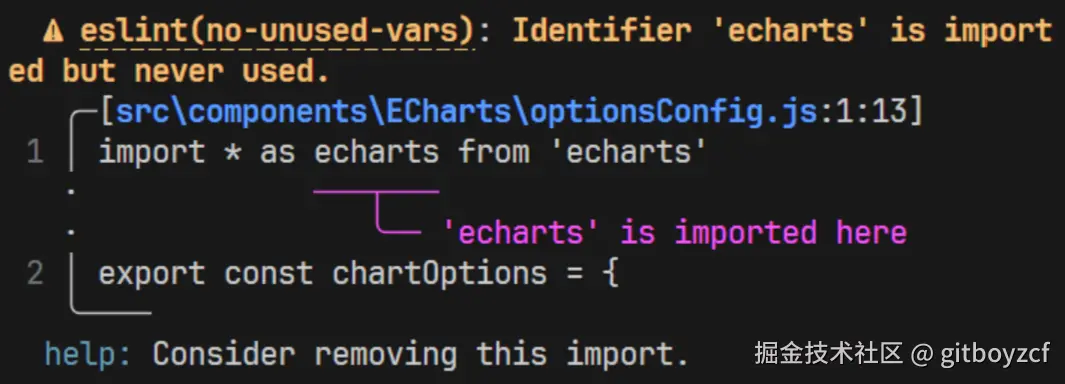
此时终端中执行 pnpm lint 或者 pnpm lint:fix 就会检测并修复代码 🤩
检测结果以 oxlint形式展现⬇️
接入 husky + lint-staged(可选)
安装依赖
pnpm i husky lint-staged -D
执行 pnpm exec husky init 并且在 package.json的 scripts里面增加 "prepare": "husky init",(其他人安装后会自动执行) 根目录会生成 .hushy 文件夹。
直接插入以下代码⬇️(没有对应文件的自行创建)
lint-staged.config.js
export default {
'**/*.{html,vue,ts,cjs,json,md}': ['prettier --write'],
'**/*.{js,mjs,cjs,jsx,ts,mts,cts,tsx,vue,astro,svelte}': ['oxlint --fix && eslint --fix']
}
通过下面命令在钩子文件中添加内容⬇️
echo "npx --no-install -- lint-staged" > .husky/pre-commit
echo "npx --no-install commitlint --edit $1" > .husky/commit-msg
注意⚠️⚠️⚠️ : 上面命令钩子不会执行 当进行git提交时会出现下面问题⬇️
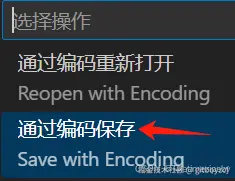
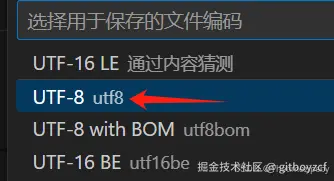
说是无法执行这个二进制文件 ,解决方案如下⬇️ 在vscode编辑器底部操作栏 会显示当前文件编码格式 默认为➡️
点击后选择
然后再次执行git提交命令就可以了🤙


接入commitizen + commitlint + cz-git(可选)
安装依赖
pnpm i commitizen commitlint @commitlint/cli @commitlint/config-conventional cz-git -D
commitizen 基于Node.js的 git commit 命令行工具,辅助生成标准化规范化的 commit message
committlint 检查你的提交消息是否符合常规的提交格式。
cz-git 标准输出格式的 commitizen 适配器
直接插入以下代码⬇️(没有对应文件的自行创建)
commitlint.config.js
export default {
extends: ['@commitlint/config-conventional'],
rules: {
'type-enum': [
2,
'always',
[
'feat',
'fix',
'perf',
'style',
'docs',
'test',
'refactor',
'build',
'ci',
'init',
'chore',
'revert',
'wip',
'workflow',
'types',
'release'
]
],
'subject-case': [0]
},
prompt: {
alias: { fd: 'docs: fix typos' },
messages: {
type: '选择你要提交的类型 :',
scope: '选择一个提交范围(可选):',
customScope: '请输入自定义的提交范围 :',
subject: '填写简短精炼的变更描述 :\n',
body: '填写更加详细的变更描述(可选)。使用 "|" 换行 :\n',
breaking: '列举非兼容性重大的变更(可选)。使用 "|" 换行 :\n',
footerPrefixesSelect: '选择关联issue前缀(可选):',
customFooterPrefix: '输入自定义issue前缀 :',
footer: '列举关联issue (可选) 例如: #31, #I3244 :\n',
confirmCommit: '是否提交或修改commit ?'
},
types: [
{ value: 'feat', name: 'feat: 🤩 新增功能 | A new feature', emoji: ':sparkles:' },
{ value: 'fix', name: 'fix: 🐛 修复缺陷 | A bug fix', emoji: ':bug:' },
{ value: 'docs', name: 'docs: 📝 文档更新 | Documentation only changes', emoji: ':memo:' },
{
value: 'style',
name: 'style: 🎨 代码格式 | Changes that do not affect the meaning of the code',
emoji: ':lipstick:'
},
{
value: 'refactor',
name: 'refactor: ♻️ 代码重构 | A code change that neither fixes a bug nor adds a feature',
emoji: ':recycle:'
},
{
value: 'perf',
name: 'perf: ⚡ 性能提升 | A code change that improves performance',
emoji: ':zap:'
},
{
value: 'test',
name: 'test: ✅ 测试相关 | Adding missing tests or correcting existing tests',
emoji: ':white_check_mark:'
},
{
value: 'build',
name: 'build: 📦️ 构建相关 | Changes that affect the build system or external dependencies',
emoji: ':package:'
},
{
value: 'ci',
name: 'ci: 🎡 持续集成 | Changes to our CI configuration files and scripts',
emoji: ':ferris_wheel:'
},
{ value: 'revert', name: 'revert: ⏪️ 回退代码 | Revert to a commit', emoji: ':rewind:' },
{
value: 'chore',
name: 'chore: 🔨 其他修改 | Other changes that do not modify src or test files',
emoji: ':hammer:'
}
],
useEmoji: true,
emojiAlign: 'center',
useAI: false,
aiNumber: 1,
themeColorCode: '',
scopes: [],
allowCustomScopes: true,
allowEmptyScopes: true,
customScopesAlign: 'bottom',
customScopesAlias: 'custom',
emptyScopesAlias: 'empty',
upperCaseSubject: false,
markBreakingChangeMode: false,
allowBreakingChanges: ['feat', 'fix'],
breaklineNumber: 100,
breaklineChar: '|',
skipQuestions: [],
issuePrefixes: [
{ value: 'link', name: 'link: 链接 ISSUES 进行中' },
{ value: 'closed', name: 'closed: 标记 ISSUES 已完成' }
],
customIssuePrefixAlign: 'top',
emptyIssuePrefixAlias: 'skip',
customIssuePrefixAlias: 'custom',
allowCustomIssuePrefix: true,
allowEmptyIssuePrefix: true,
confirmColorize: true,
scopeOverrides: undefined,
defaultBody: '',
defaultIssues: '',
defaultScope: '',
defaultSubject: ''
}
}
配置package.json文件
"scripts": {
"dev": "vite --host",
"build": "vite build",
"preview": "vite preview",
"lint": "oxlint && eslint",
"lint:fix": "oxlint --fix && eslint --fix",
"cz": "git-cz"
},
"config": {
"commitizen": {
"path": "node_modules/cz-git"
}
}
测试
在终端命令行中输入⬇️
git add .
pnpm cz
然后会出现本次git提交选项
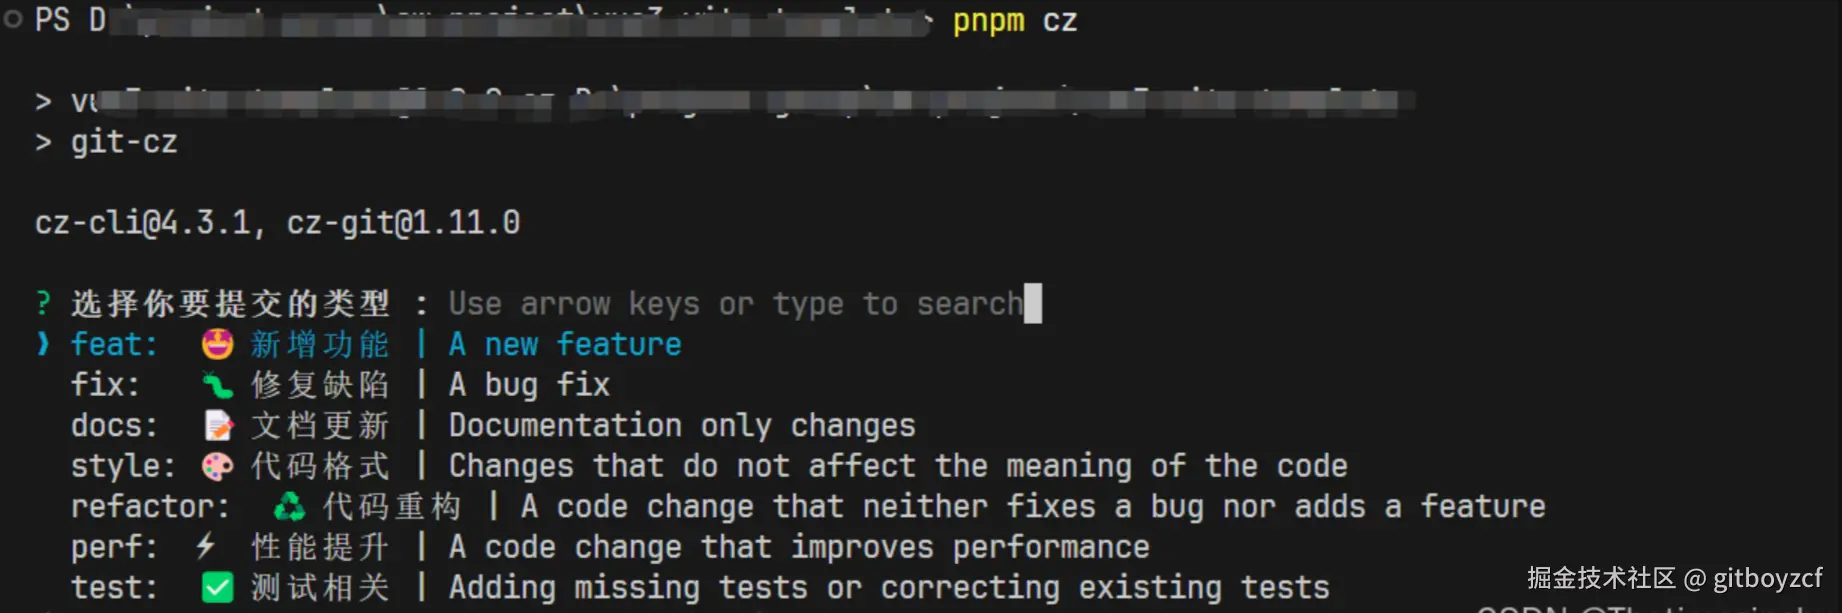
根据需求选择
ctrl + c 终止当前提交
Enter 下一步操作
模板
拉取后 开箱即用 模板地址➡️ github.com/gitboyzcf/v…
样例
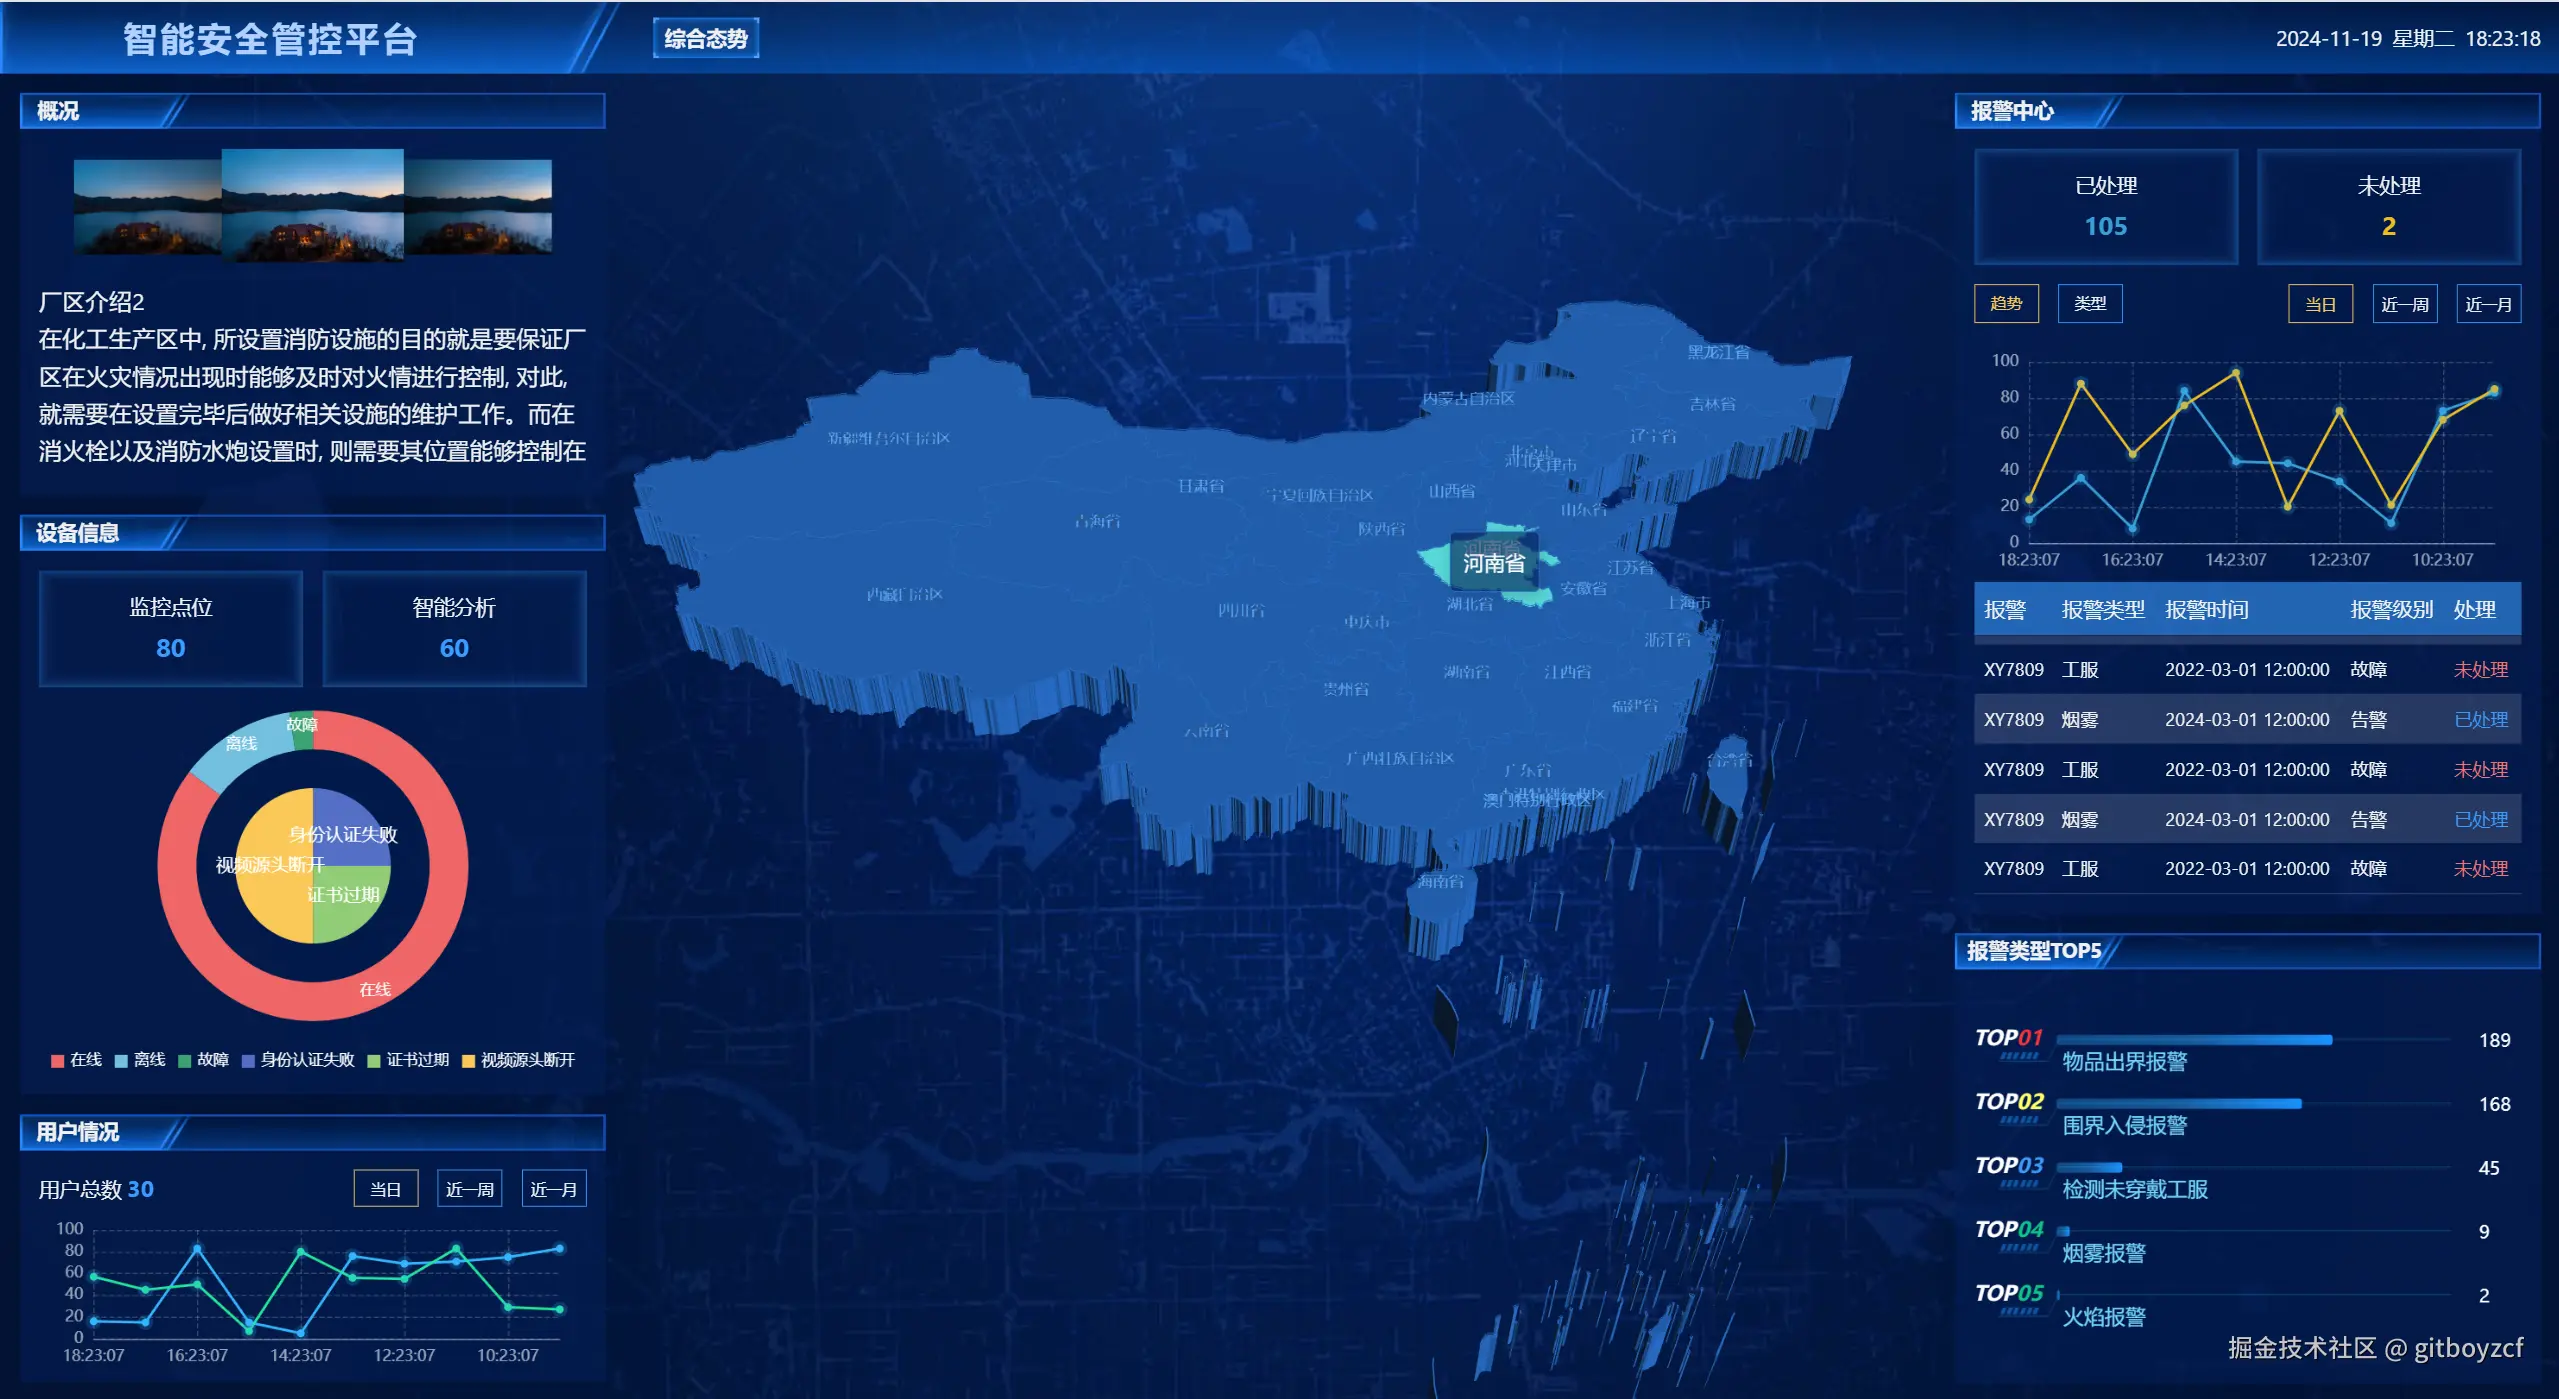
此模板开发大屏模板样例➡️ github.com/gitboyzcf/v…
如果您觉得这篇文章有帮助,请点个赞吧~
评论
请登录后发表评论
去登录