websocket封装
简介
websocket在前端开发中,是一个必须掌握的技术!你可以不用,但必须掌握!
前几天,就遇到这样一个需求,要求界面的数据通过websocket实时推送,并且必须支持断网重连、自动心跳!
自动心跳是定期向服务端发送小型数据包,如果一段时间内服务端没有收到心跳响应,系统可能会断开连接。
websokect的API非常简单
// 创建ws连接
const ws = new WebSocket('ws://localhost:8080/test');
ws.onopen = function() {
console.log('WebSocket 连接已经建立。');
ws.send('Hello, server!');
};
ws.onmessage = function(event) {
console.log('收到服务器消息:',event.data);
};
ws.onerror = function(event) {
console.error('WebSocket 连接出现错误:', event);
};
ws.onclose = function() {
console.log('WebSocket 连接已经关闭。');
}但是,要封装一个支持断网重连、自动心跳的websokect没有那么容易!
封装成功演示
核心优势
我们先看我封装的websokect,首先,最重要的,它的使用方法和官方Api完全一致!零学习成本,上手即用!
import WebSocketClient from "./WebSocketClient"
// 创建实例
const ws = new WebSocketClient('ws://localhost:3200');
// 连接
ws.connect()
// 同原生方法
ws.onclose(()=>{})
// 同原生方法
ws.onerror(()=>{})
// 同原生方法
ws.onmessage(()=>{
// 同原生方法 ws.send("自定义发送的数据")
})
// 同原生方法
ws.onopen(()=>{})
// 关闭连接
ws.close()效果演示
后端服务创建
我们先使用node创建一个后端服务,安装ws库:
npm install ws创建node index.js文件,引入WebSocket 服务器
const WebSocket = require("ws");
const wss = new WebSocket.Server({ port: 3200 });
console.log("服务运行在http://localhost:3200/");
wss.on("connection", (ws) => {
console.log("[服务器]:客官您来了~里边请");
ws.send(`[websocket云端]您已经连接云端!数据推送中!`);
let index = 1;
const interval = setInterval(() => {
ws.send(`[websocket]数据推送第${index}次`);
index ++
}, 1000 * 10);
ws.on("close", () => {
clearInterval(interval);
// 清除定时器
console.log("[服务器]:客官下次再来呢~");
});
});我们启动这个服务
node index.js现在,我们在前端服务内进行连接测试
前端websokect测试
我们先写前端的相关逻辑
import { WebSocketClient } from '@/utils/dataDispatcher/WebSocketClient';
const ws = new WebSocketClient('ws://localhost:3200');
// 连接
ws.connect();
// 同原生方法
ws.onclose(() => {});
// 同原生方法
ws.onerror(() => {});
// 同原生方法
ws.onmessage(() => {
// 同原生方法
ws.send('自定义发送的数据');
});
// 同原生方法
ws.onopen(() => {});启动项目,我们会发现控制台已经有了提示

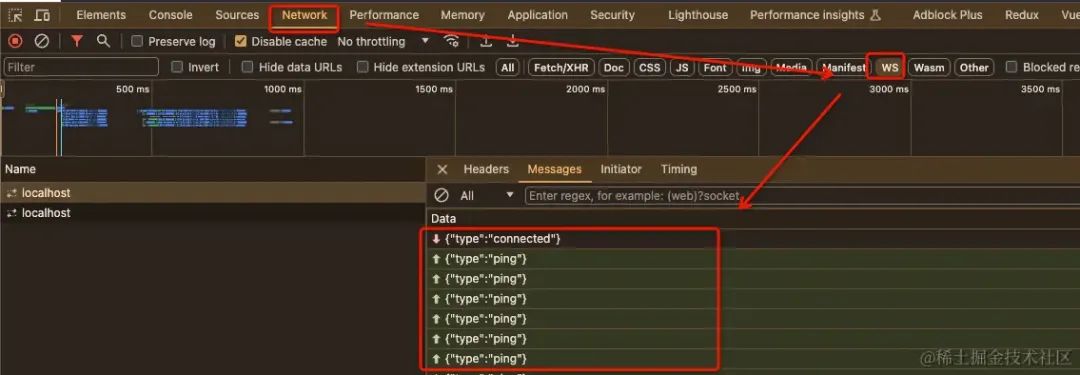
心跳验证:
等待一段时间后,我们可以看到ws连接里,前端已经发送了多次心跳数据
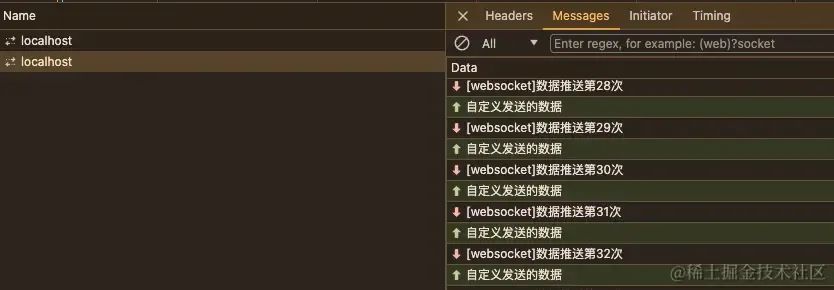
服务端与客户端也一直在进行数据交互
断网重连验证:
可以看到,当我们断开服务端的时候,断网重连被自动触发。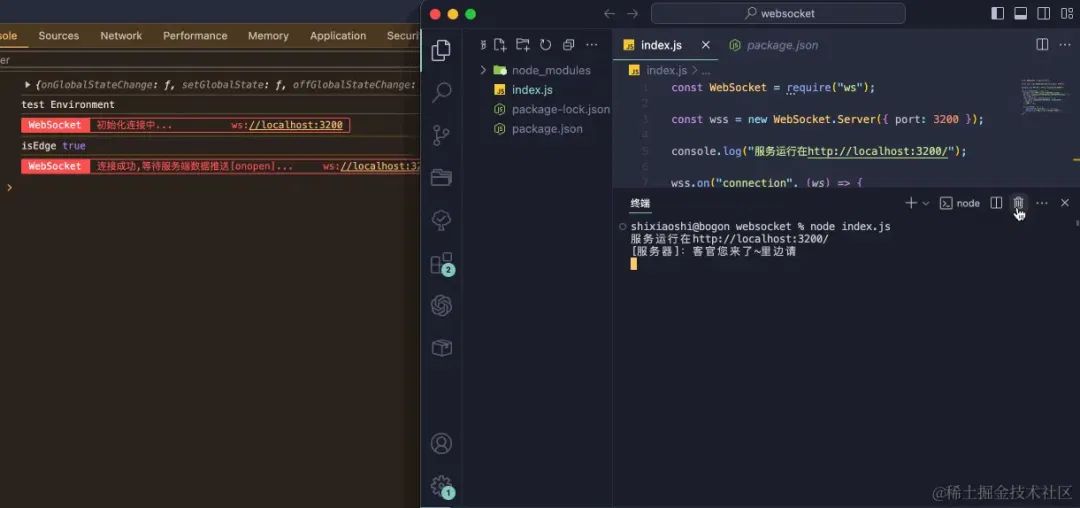
技术路线
基本框架搭建
export class WebSocketClient {
// #socket链接
private url = '';
// #socket实例
private socket: WebSocket | null = null;
constructor(url: string) {
super();
this.url = url;
}
// >消息发送
public send(message: string): void {
if (this.socket && this.socket.readyState === WebSocket.OPEN) {
this.socket.send(message);
} else {
console.error('[WebSocket] 未连接');
}
}
// !初始化连接
public connect(): void {
if (this.socket && this.socket.readyState === Web
Socket.OPEN) {
return;
}
this.socket = new WebSocket(this.url);
// !websocket连接成功
this.socket.onopen = event => {
console.log(`连接成功,等待服务端数据推送[onopen]...`);
};
this.socket.onmessage = event => {
};
this.socket.onclose = event => {
console.log(`连接断开[onclose]...`);
};
this.socket.onerror = event => {
console.log(`连接异常[onerror]...`);
};
}
// >关闭连接
public close(): void {
if (this.socket) {
this.socket.close();
this.socket = null;
}
}}上述代码借助官方API实现了一个基本的 WebSocket 客户端,具有以下功能:
-
初始化连接并处理各种 WebSocket 事件(打开、消息、关闭、错误)。
-
发送消息到服务器。
-
关闭连接。
现在,我们开始逐步完善代码,进行封装。
断网重连封装
export class WebSocketClient{
// #socket链接
private url = '';
// #socket实例
private socket: WebSocket | null = null;
// #重连次数
private reconnectAttempts = 0;
// #最大重连数
private maxReconnectAttempts = 5;
// #重连间隔
private reconnectInterval = 10000; // 10 seconds
constructor(url: string) {
super();
this.url = url;
}
// >消息发送
public send(message: string): void {
if (this.socket && this.socket.readyState === WebSocket.OPEN) {
this.socket.send(message);
} else {
console.error('[WebSocket] 未连接');
}
}
// !初始化连接
public connect(): void {
if (this.reconnectAttempts === 0) {
console.log(`初始化连接中...`);
}
if (this.socket && this.socket.readyState === WebSocket.OPEN) {
return;
}
this.socket = new WebSocket(this.url);
// !websocket连接成功
this.socket.onopen = event => {
// 重置重连尝试成功连接
this.reconnectAttempts = 0;
console.log(`连接成功,等待服务端数据推送[onopen]...`);
};
this.socket.onmessage = event => {
};
this.socket.onclose = event => {
if (this.reconnectAttempts === 0) {
console.log(`连接断开[onclose]...`);
}
if (!this.stopWs) {
this.handleReconnect();
}
};
this.socket.onerror = event => {
if (this.reconnectAttempts === 0) {
console.log(`连接异常[onerror]...`);
}
};
}
// > 断网重连逻辑
private handleReconnect(): void {
if (this.reconnectAttempts < this.maxReconnectAttempts) {
this.reconnectAttempts++;
console.log(`尝试重连... (${this.reconnectAttempts}/${this.maxReconnectAttempts})`);
setTimeout(() => {
this.connect();
}, this.reconnectInterval);
} else {
console.log(`最大重连失败,终止重连: ${this.url}`);
}
}
// >关闭连接
public close(): void {
if (this.socket) {
this.socket.close();
this.socket = null;
}
}
}上述代码添加了自动断网重连的机制。其核心逻辑在于以下几个方面:
-
记录重连次数:通过 reconnectAttempts 属性记录当前已经尝试重连的次数。
-
设置最大重连次数:通过 maxReconnectAttempts 属性设置允许的最大重连次数。
-
重连逻辑:在 onclose 和 onerror 事件中调用重连处理函数 handleReconnect。
-
重连间隔:通过 reconnectInterval 属性设置每次重连的间隔时间,可以在每次重连时增加间隔以实现指数退避。
初始化连接并处理事件
在 connect 方法中,初始化 WebSocket 连接并为其设置事件处理函数。特别关注 onclose 和 onerror 事件,在连接关闭和出现错误时调用重连逻辑。
public connect(): void {
if (this.reconnectAttempts === 0) {
console.log(`初始化连接中...`);
}
if (this.socket && this.socket.readyState === WebSocket.OPEN) {
return;
}
this.socket = new WebSocket(this.url);
this.socket.onopen = (event: Event) => {
this.reconnectAttempts = 0;
console.log(`连接成功,等待服务端数据推送[onopen]...`);
};
this.socket.onclose = (event: CloseEvent) => {
if (this.reconnectAttempts === 0) {
console.log(`连接断开[onclose]...`);
}
this.handleReconnect();
};
this.socket.onerror = (event: Event) => {
if (this.reconnectAttempts === 0) {
console.log(`连接异常[onerror]...`);
}
this.handleReconnect();
};
}处理重连逻辑
在 handleReconnect 方法中,实现了实际的重连逻辑。该方法会递增 reconnectAttempts,检查是否达到最大重连次数,如果没有达到,则在指定的重连间隔后再次调用 connect 方法尝试重连。
private handleReconnect(): void {
if (this.reconnectAttempts < this.maxReconnectAttempts) {
this.reconnectAttempts++;
console.log(`尝试重连... (${this.reconnectAttempts}/${this.maxReconnectAttempts})`);
setTimeout(() => {
this.connect();
}, this.reconnectInterval * this.reconnectAttempts); // 重连间隔可以增加,例如指数退避
} else {
console.log(`最大重连失败,终止重连: ${this.url}`);
}
}关闭连接
在 close 方法中,手动关闭 WebSocket 连接并将 socket 设置为 null。
public close(): void {
if (this.socket) {
this.socket.close();
this.socket = null;
}
}自动心跳封装
自动心跳(Automatic Heartbeat)是一种在网络通信中常用的机制,用于维持连接的活跃状态,检测连接是否仍然有效,并及时发现和处理连接断开或故障的情况。心跳机制通过定期发送“心跳”消息(通常是一个简单的 ping 或者 pong 消息)来确认连接双方的状态。
实现自动心跳的基本思路
-
发送心跳消息:在 WebSocket 连接建立后,启动一个定时器,定期发送心跳消息到服务器。
-
接收心跳响应:服务器收到心跳消息后返回响应,客户端接收到响应后重置定时器。
-
检测心跳超时:如果在指定时间内没有收到心跳响应,则认为连接断开,进行重连。
export class WebSocketClient {
// #socket链接
private url = '';
// #socket实例
private socket: WebSocket | null = null;
// #重连次数
private reconnectAttempts = 0;
// #最大重连数
private maxReconnectAttempts = 5;
// #重连间隔
private reconnectInterval = 10000; // 10 seconds
// #发送心跳数据间隔
private heartbeatInterval = 1000 * 30;
// #计时器id
private heartbeatTimer?: NodeJS.Timeout;
// #彻底终止ws
private stopWs = false;
// *构造函数
constructor(url: string) {
super();
this.url = url;
}
// >消息发送
public send(message: string): void {
if (this.socket && this.socket.readyState === WebSocket.OPEN) {
this.socket.send(message);
} else {
console.error('[WebSocket] 未连接');
}
}
// !初始化连接
public connect(): void {
if (this.reconnectAttempts === 0) {
console.log('WebSocket', `初始化连接中...`);
}
if (this.socket && this.socket.readyState === WebSocket.OPEN) {
return;
}
this.socket = new WebSocket(this.url);
// !websocket连接成功
this.socket.onopen = event => {
this.stopWs = false;
// 重置重连尝试成功连接
this.reconnectAttempts = 0;
// 在连接成功时停止当前的心跳检测并重新启动
this.startHeartbeat();
console.log(`连接成功,等待服务端数据推送[onopen]...`);
};
this.socket.onmessage = event => {
this.dispatchEvent('message', event);
this.startHeartbeat();
};
this.socket.onclose = event => {
if (this.reconnectAttempts === 0) {
console.log(`连接断开[onclose]...`);
}
if (!this.stopWs) {
this.handleReconnect();
}
};
this.socket.onerror = event => {
if (this.reconnectAttempts === 0) {
console.log(`连接异常[onerror]...`);
}
this.closeHeartbeat();
};
}
// > 断网重连逻辑
private handleReconnect(): void {
if (this.reconnectAttempts < this.maxReconnectAttempts) {
this.reconnectAttempts++;
console.log('WebSocket', `尝试重连...`);
setTimeout(() => {
this.connect();
}, this.reconnectInterval);
} else {
this.closeHeartbeat();
console.log(`最大重连失败,终止重连: ${this.url}`);
}
}
// >关闭连接
public close(): void {
if (this.socket) {
this.stopWs = true;
this.socket.close();
this.socket = null;
}
this.closeHeartbeat();
}
// >开始心跳检测 -> 定时发送心跳消息
private startHeartbeat(): void {
if (this.stopWs) return;
if (this.heartbeatTimer) {
this.closeHeartbeat();
}
this.heartbeatTimer = setInterval(() => {
if (this.socket) {
this.socket.send(JSON.stringify({ type: 'heartBeat', data: {} }));
console.log('WebSocket', '送心跳数据...');
} else {
console.error('[WebSocket] 未连接');
}
}, this.heartbeatInterval);
}
// >关闭心跳
private closeHeartbeat(): void {
clearInterval(this.heartbeatTimer);
this.heartbeatTimer = undefined;
}
}上述代码通过定时发送心跳消息来实现自动心跳机制,并结合断网重连逻辑来确保 WebSocket 连接的稳定性。
心跳机制的实现原理简析:
- 在连接成功时启动心跳检测
在 connect() 方法中,当 WebSocket 连接成功(onopen 事件触发)时,调用 startHeartbeat() 方法。
this.socket.onopen = event => {
this.stopWs = false;
this.reconnectAttempts = 0;
this.startHeartbeat();
console.log(`连接成功,等待服务端数据推送[onopen]...`);
};- 定时发送心跳消息
startHeartbeat() 方法启动一个定时器,每隔 heartbeatInterval 时间(30秒)发送一次心跳消息。
private startHeartbeat(): void {
if (this.stopWs) return;
if (this.heartbeatTimer) {
this.closeHeartbeat();
}
this.heartbeatTimer = setInterval(() => {
if (this.socket) {
this.socket.send(JSON.stringify({ type: 'heartBeat', data: {} }));
console.log('WebSocket', '发送心跳数据...');
} else {
console.error('[WebSocket] 未连接');
}
}, this.heartbeatInterval);
}- 停止心跳检测
closeHeartbeat() 方法用于停止心跳检测,清除定时器。
private closeHeartbeat(): void {
clearInterval(this.heartbeatTimer);
this.heartbeatTimer = undefined;
}- 在连接断开或发生错误时停止心跳检测
在 onclose 和 onerror 事件中调用 closeHeartbeat(),停止心跳检测。
this.socket.onclose = event => {
if (this.reconnectAttempts === 0) {
console.log(`连接断开[onclose]...`);
}
if (!this.stopWs) {
this.handleReconnect();
}
};
this.socket.onerror = event => {
if (this.reconnectAttempts === 0) {
console.log(`连接异常[onerror]...`);
}
this.closeHeartbeat();
};如何触发原生函数
现在,我们已经基本完成了功能的封装,那么,我们如何在外部调用原生的websokectApi呢?非常简单,借助几个自定义的生命周期函数即可!
import { EventDispatcher } from './dispatcher';
export class WebSocketClient extends EventDispatcher {
//...
constructor(url: string) {
super();
this.url = url;
}
// >生命周期钩子
onopen(callBack: Function) {
this.addEventListener('open', callBack);
}
onmessage(callBack: Function) {
this.addEventListener('message', callBack);
}
onclose(callBack: Function) {
this.addEventListener('close', callBack);
}
onerror(callBack: Function) {
this.addEventListener('error', callBack);
}
// !初始化连接
public connect(): void {
// ...
// !websocket连接成功
this.socket.onopen = event => {
// ...
this.dispatchEvent('open', event);
};
this.socket.onmessage = event => {
this.dispatchEvent('message', event);
this.startHeartbeat();
};
this.socket.onclose = event => {
// ...
this.dispatchEvent('close', event);
};
this.socket.onerror = event => {
// ...
this.closeHeartbeat();
this.dispatchEvent('error', event);
};
}
// >关闭连接
public close(): void {
if (this.socket) {
this.stopWs = true;
this.socket.close();
this.socket = null;
this.removeEventListener('open');
this.removeEventListener('message');
this.removeEventListener('close');
this.removeEventListener('error');
}
this.closeHeartbeat();
}
// ...
}当原生的onclose、onopen方法触发时,会通过dispatchEvent触发相应的调度,进而触发通过addEventListener绑定的生命周期函数!
注意,这里的this.dispatchEvent方法,addEventListener方法都是通过类继承EventDispatcher方法获得的!
EventDispatcher源码如下:
export class EventDispatcher {
private listeners: { [type: string]: Function[] } = {};
protected addEventListener(type: string, listener: Function) {
if (!this.listeners[type]) {
this.listeners[type] = [];
}
if (this.listeners[type].indexOf(listener) === -1) {
this.listeners[type].push(listener);
}
}
protected removeEventListener(type: string) {
this.listeners[type] = [];
}
protected dispatchEvent(type: string, data: any) {
const listenerArray = this.listeners[type] || [];
if (listenerArray.length === 0) return;
listenerArray.forEach(listener => {
listener.call(this, data);
});
}
}关于EventDispatcher的实现原理,请参考博主的其他文章:
juejin.cn/post/735851…[1]
完整代码
ts版本
import { EventDispatcher } from './dispatcher';
export class WebSocketClient extends EventDispatcher {
// #socket链接
private url = '';
// #socket实例
private socket: WebSocket | null = null;
// #重连次数
private reconnectAttempts = 0;
// #最大重连数
private maxReconnectAttempts = 5;
// #重连间隔
private reconnectInterval = 10000; // 10 seconds
// #发送心跳数据间隔
private heartbeatInterval = 1000 * 30;
// #计时器id
private heartbeatTimer?: NodeJS.Timeout;
// #彻底终止ws
private stopWs = false;
// *构造函数
constructor(url: string) {
super();
this.url = url;
}
// >生命周期钩子
onopen(callBack: Function) {
this.addEventListener('open', callBack);
}
onmessage(callBack: Function) {
this.addEventListener('message', callBack);
}
onclose(callBack: Function) {
this.addEventListener('close', callBack);
}
onerror(callBack: Function) {
this.addEventListener('error', callBack);
}
// >消息发送
public send(message: string): void {
if (this.socket && this.socket.readyState === WebSocket.OPEN) {
this.socket.send(message);
} else {
console.error('[WebSocket] 未连接');
}
}
// !初始化连接
public connect(): void {
if (this.reconnectAttempts === 0) {
this.log('WebSocket', `初始化连接中... ${this.url}`);
}
if (this.socket && this.socket.readyState === WebSocket.OPEN) {
return;
}
this.socket = new WebSocket(this.url);
// !websocket连接成功
this.socket.onopen = event => {
this.stopWs = false;
// 重置重连尝试成功连接
this.reconnectAttempts = 0;
// 在连接成功时停止当前的心跳检测并重新启动
this.startHeartbeat();
this.log('WebSocket', `连接成功,等待服务端数据推送[onopen]... ${this.url}`);
this.dispatchEvent('open', event);
};
this.socket.onmessage = event => {
this.dispatchEvent('message', event);
this.startHeartbeat();
};
this.socket.onclose = event => {
if (this.reconnectAttempts === 0) {
this.log('WebSocket', `连接断开[onclose]... ${this.url}`);
}
if (!this.stopWs) {
this.handleReconnect();
}
this.dispatchEvent('close', event);
};
this.socket.onerror = event => {
if (this.reconnectAttempts === 0) {
this.log('WebSocket', `连接异常[onerror]... ${this.url}`);
}
this.closeHeartbeat();
this.dispatchEvent('error', event);
};
}
// > 断网重连逻辑
private handleReconnect(): void {
if (this.reconnectAttempts < this.maxReconnectAttempts) {
this.reconnectAttempts++;
this.log('WebSocket', `尝试重连... (${this.reconnectAttempts}/${this.maxReconnectAttempts}) ${this.url}`);
setTimeout(() => {
this.connect();
}, this.reconnectInterval);
} else {
this.closeHeartbeat();
this.log('WebSocket', `最大重连失败,终止重连: ${this.url}`);
}
}
// >关闭连接
public close(): void {
if (this.socket) {
this.stopWs = true;
this.socket.close();
this.socket = null;
this.removeEventListener('open');
this.removeEventListener('message');
this.removeEventListener('close');
this.removeEventListener('error');
}
this.closeHeartbeat();
}
// >开始心跳检测 -> 定时发送心跳消息
private startHeartbeat(): void {
if (this.stopWs) return;
if (this.heartbeatTimer) {
this.closeHeartbeat();
}
this.heartbeatTimer = setInterval(() => {
if (this.socket) {
this.socket.send(JSON.stringify({ type: 'heartBeat', data: {} }));
this.log('WebSocket', '送心跳数据...');
} else {
console.error('[WebSocket] 未连接');
}
}, this.heartbeatInterval);
}
// >关闭心跳
private closeHeartbeat(): void {
clearInterval(this.heartbeatTimer);
this.heartbeatTimer = undefined;
}
}
class Log {
private static console = true;
log(title: string, text: string) {
if (!Log.console) return;
if (import.meta.env.MODE === 'production') return;
const color = '#ff4d4f';
console.log(
`%c ${title} %c ${text} %c`,
`background:${color};border:1px solid ${color}; padding: 1px; border-radius: 2px 0 0 2px; color: #fff;`,
`border:1px solid ${color}; padding: 1px; border-radius: 0 2px 2px 0; color: ${color};`,
'background:transparent'
);
}
closeConsole() {
Log.console = false;
}
}
export class EventDispatcher extends Log {
private listeners: { [type: string]: Function[] } = {};
protected addEventListener(type: string, listener: Function) {
if (!this.listeners[type]) {
this.listeners[type] = [];
}
if (this.listeners[type].indexOf(listener) === -1) {
this.listeners[type].push(listener);
}
}
protected removeEventListener(type: string) {
this.listeners[type] = [];
}
protected dispatchEvent(type: string, data: any) {
const listenerArray = this.listeners[type] || [];
if (listenerArray.length === 0) return;
listenerArray.forEach(listener => {
listener.call(this, data);
});
}
}
js版本
export class WebSocketClient extends EventDispatcher {
// #socket链接
url = '';
// #socket实例
socket = null;
// #重连次数
reconnectAttempts = 0;
// #最大重连数
maxReconnectAttempts = 5;
// #重连间隔
reconnectInterval = 10000; // 10 seconds
// #发送心跳数据间隔
heartbeatInterval = 1000 * 30;
// #计时器id
heartbeatTimer = undefined;
// #彻底终止ws
stopWs = false;
// *构造函数
constructor(url) {
super();
this.url = url;
}
// >生命周期钩子
onopen(callBack) {
this.addEventListener('open', callBack);
}
onmessage(callBack) {
this.addEventListener('message', callBack);
}
onclose(callBack) {
this.addEventListener('close', callBack);
}
onerror(callBack) {
this.addEventListener('error', callBack);
}
// >消息发送
send(message) {
if (this.socket && this.socket.readyState === WebSocket.OPEN) {
this.socket.send(message);
} else {
console.error('[WebSocket] 未连接');
}
}
// !初始化连接
connect() {
if (this.reconnectAttempts === 0) {
this.log('WebSocket', `初始化连接中... ${this.url}`);
}
if (this.socket && this.socket.readyState === WebSocket.OPEN) {
return;
}
this.socket = new WebSocket(this.url);
// !websocket连接成功
this.socket.onopen = event => {
this.stopWs = false;
// 重置重连尝试成功连接
this.reconnectAttempts = 0;
// 在连接成功时停止当前的心跳检测并重新启动
this.startHeartbeat();
this.log('WebSocket', `连接成功,等待服务端数据推送[onopen]... ${this.url}`);
this.dispatchEvent('open', event);
};
this.socket.onmessage = event => {
this.dispatchEvent('message', event);
this.startHeartbeat();
};
this.socket.onclose = event => {
if (this.reconnectAttempts === 0) {
this.log('WebSocket', `连接断开[onclose]... ${this.url}`);
}
if (!this.stopWs) {
this.handleReconnect();
}
this.dispatchEvent('close', event);
};
this.socket.onerror = event => {
if (this.reconnectAttempts === 0) {
this.log('WebSocket', `连接异常[onerror]... ${this.url}`);
}
this.closeHeartbeat();
this.dispatchEvent('error', event);
};
}
// > 断网重连逻辑
handleReconnect() {
if (this.reconnectAttempts < this.maxReconnectAttempts) {
this.reconnectAttempts++;
this.log('WebSocket', `尝试重连... (${this.reconnectAttempts}/${this.maxReconnectAttempts}) ${this.url}`);
setTimeout(() => {
this.connect();
}, this.reconnectInterval);
} else {
this.closeHeartbeat();
this.log('WebSocket', `最大重连失败,终止重连: ${this.url}`);
}
}
// >关闭连接
close() {
if (this.socket) {
this.stopWs = true;
this.socket.close();
this.socket = null;
this.removeEventListener('open');
this.removeEventListener('message');
this.removeEventListener('close');
this.removeEventListener('error');
}
this.closeHeartbeat();
}
// >开始心跳检测 -> 定时发送心跳消息
startHeartbeat() {
if (this.stopWs) return;
if (this.heartbeatTimer) {
this.closeHeartbeat();
}
this.heartbeatTimer = setInterval(() => {
if (this.socket) {
this.socket.send(JSON.stringify({ type: 'heartBeat', data: {} }));
this.log('WebSocket', '送心跳数据...');
} else {
console.error('[WebSocket] 未连接');
}
}, this.heartbeatInterval);
}
// >关闭心跳
closeHeartbeat() {
clearInterval(this.heartbeatTimer);
this.heartbeatTimer = undefined;
}
}
class Log {
static console = true;
log(title, text) {
if (!Log.console) return;
if (import.meta.env.MODE === 'production') return;
const color = '#ff4d4f';
console.log(
`%c ${title} %c ${text} %c`,
`background:${color};border:1px solid ${color}; padding: 1px; border-radius: 2px 0 0 2px; color: #fff;`,
`border:1px solid ${color}; padding: 1px; border-radius: 0 2px 2px 0; color: ${color};`,
'background:transparent'
);
}
closeConsole() {
Log.console = false;
}
}
export class EventDispatcher extends Log {
listeners = {};
addEventListener(type, listener) {
if (!this.listeners[type]) {
this.listeners[type] = [];
}
if (this.listeners[type].indexOf(listener) === -1) {
this.listeners[type].push(listener);
}
}
removeEventListener(type) {
this.listeners[type] = [];
}
dispatchEvent(type, data) {
const listenerArray = this.listeners[type] || [];
if (listenerArray.length === 0) return;
listenerArray.forEach(listener => {
listener.call(this, data);
});
}
}
总结
这篇文章封装了weboskect,完美支持了断网重连、自动心跳的功能,且完全兼容原生写法,无任何学习负担,开开箱即用!但美中不足的是,断网重连时间、心跳数据内容目前都是写死的,大家可以根据自己的情况做一些更改,让它更灵活!
参考资料
[1]
https://juejin.cn/post/7358518759118700607: https://juejin.cn/post/7358518759118700607
推荐阅读 点击标题可跳转
如果您觉得这篇文章有帮助,请点个赞吧~
评论
请登录后发表评论
去登录