Canvas星空类特效
2024-08-07
385 字约 2 分钟

...
思路
- 绘制单个星星
- 在画布批量随机绘制星星
- 添加星星移动动画
- 页面resize处理
Vanilla JavaScript实现
- 初始化一个工程
pnpm create vite@latest
cd <工程目录> pnpm install pnpm dev
body {
background-color: black;
overflow: hidden;
}
"use strict";
import './style.css';
document.querySelector('#app').innerHTML = `
<canvas id="canvas"></canvas>
`;
- 绘制单个星星
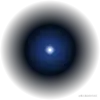
const hue = 220;
const offscreenCanvas = document.createElement("canvas");
const offscreenCtx = offscreenCanvas.getContext("2d");
offscreenCanvas.width = 100;
offscreenCanvas.height = 100;
const half = offscreenCanvas.width / 2;
const middle = half;
const gradient = offscreenCtx.createRadialGradient(
middle,
middle,
0,
middle,
middle,
half
);
gradient.addColorStop(0.01, "#fff");
gradient.addColorStop(0.1, `hsl(${hue}, 61%, 33%)`);
gradient.addColorStop(0.5, `hsl(${hue}, 64%, 6%)`);
gradient.addColorStop(1, "transparent");
offscreenCtx.fillStyle = gradient;
offscreenCtx.beginPath();
offscreenCtx.arc(middle, middle, half, 0, Math.PI * 2);
offscreenCtx.fill();
参考链接:
- 在画布批量绘制星星
其实要绘制星星,我们只需要在画布上基于离屏画布来在指定位置将离屏画布渲染成图片即可,但是批量绘制以及后续的动画需要我们能记录每颗星星的位置、状态和行驶轨迹,所以可以考虑创建一个星星的类。
const stars = [];
const maxStars = 1000;
const random = (min, max) => {
if (!max) {
max = min;
min = 0;
}
if (min > max) {
[min, max] = [max, min];
}
return Math.floor(Math.random() * (max - min + 1)) + min;
};
const maxOrbit = (_w, _h) => {
const max = Math.max(_w, _h);
const diameter = Math.round(Math.sqrt(max * max + max * max));
return diameter / 2;
};
class Star {
constructor(_ctx, _w, _h) {
this.ctx = _ctx;
this.maxOrbitRadius = maxOrbit(_w, _h);
this.orbitRadius = random(this.maxOrbitRadius);
this.radius = random(60, this.orbitRadius) / 12;
this.orbitX = _w / 2;
this.orbitY = _h / 2;
this.elapsedTime = random(0, maxStars);
this.speed = random(this.orbitRadius) / 500000;
this.alpha = random(2, 10) / 10;
}
draw() {
const x = Math.sin(this.elapsedTime) * this.orbitRadius + this.orbitX;
const y = Math.cos(this.elapsedTime) * this.orbitRadius + this.orbitY;
const spark = Math.random();
if (spark < 0.5 && this.alpha > 0) {
this.alpha -= 0.05;
} else if (spark > 0.5 && this.alpha < 1) {
this.alpha += 0.05;
}
this.ctx.globalAlpha = this.alpha;
this.ctx.drawImage(offscreenCanvas, x - this.radius / 2, y - this.radius / 2, this.radius, this.radius);
this.elapsedTime += this.speed;
}
}
获取当前画布,批量添加星星
const canvas = document.getElementById('canvas');
const ctx = canvas.getContext('2d');
let w = canvas.width = window.innerWidth;
let h = canvas.height = window.innerHeight;
for (let i = 0; i < maxStars; i++) {
stars.push(new Star(ctx, w, h));
}
- 添加星星的移动动画
function animation() {
ctx.globalCompositeOperation = 'source-over';
ctx.globalAlpha = 0.8;
ctx.fillStyle = `hsla(${hue} , 64%, 6%, 1)`;
ctx.fillRect(0, 0, w, h);
ctx.globalCompositeOperation = 'lighter';
stars.forEach(star => {
star.draw();
});
window.requestAnimationFrame(animation);
}
animation();
这样星星就动起来了。
- 页面resize处理
其实只需要在resize事件触发时重新设定画布的大小即可
window.addEventListener('resize', () => {
w = canvas.width = window.innerWidth;
h = canvas.height = window.innerHeight;
});
但是有一个问题,就是星星的运行轨迹并没有按比例变化,所以需要添加两处变化
class Star {
constructor(_ctx, _w, _h) {
update(_w, _h) {
const ratio = maxOrbit(_w, _h) / this.maxOrbitRadius;
if (ratio !== 1) {
this.maxOrbitRadius = maxOrbit(_w, _h);
this.orbitRadius = this.orbitRadius * ratio;
this.radius = this.radius * ratio;
this.orbitX = _w / 2;
this.orbitY = _h / 2;
}
}
draw() {
}
function animation() {
stars.forEach(star => {
star.update(w, h);
star.draw();
});
}
React实现
react实现主要需要注意resize事件的处理,怎样避免重绘时对星星数据初始化,当前思路是使用多个useEffect
import React, { useEffect, useRef, useState } from 'react';
const HUE = 217;
const MAX_STARS = 1000;
const random = (min: number, max?: number) => {
if (!max) {
max = min;
min = 0;
}
if (min > max) {
[min, max] = [max, min];
}
return Math.floor(Math.random() * (max - min + 1)) + min;
};
const maxOrbit = (_w: number, _h: number) => {
const max = Math.max(_w, _h);
const diameter = Math.round(Math.sqrt(max * max + max * max));
return diameter / 2;
};
const getOffscreenCanvas = () => {
const offscreenCanvas = document.createElement('canvas');
const offscreenCtx = offscreenCanvas.getContext('2d')!;
offscreenCanvas.width = 100;
offscreenCanvas.height = 100;
const half = offscreenCanvas.width / 2;
const middle = half;
const gradient = offscreenCtx.createRadialGradient(middle, middle, 0, middle, middle, half);
gradient.addColorStop(0.01, '#fff');
gradient.addColorStop(0.1, `hsl(${HUE}, 61%, 33%)`);
gradient.addColorStop(0.5, `hsl(${HUE}, 64%, 6%)`);
gradient.addColorStop(1, 'transparent');
offscreenCtx.fillStyle = gradient;
offscreenCtx.beginPath();
offscreenCtx.arc(middle, middle, half, 0, Math.PI * 2);
offscreenCtx.fill();
return offscreenCanvas;
};
class OffscreenCanvas {
static instance: HTMLCanvasElement = getOffscreenCanvas();
}
class Star {
orbitRadius!: number;
maxOrbitRadius!: number;
radius!: number;
orbitX!: number;
orbitY!: number;
elapsedTime!: number;
speed!: number;
alpha!: number;
ratio = 1;
offscreenCanvas = OffscreenCanvas.instance;
constructor(
private ctx: CanvasRenderingContext2D,
private canvasSize: { w: number, h: number; },
) {
this.maxOrbitRadius = maxOrbit(this.canvasSize.w, this.canvasSize.h);
this.orbitRadius = random(this.maxOrbitRadius);
this.radius = random(60, this.orbitRadius) / 12;
this.orbitX = this.canvasSize.w / 2;
this.orbitY = this.canvasSize.h / 2;
this.elapsedTime = random(0, MAX_STARS);
this.speed = random(this.orbitRadius) / 500000;
this.alpha = random(2, 10) / 10;
}
update(size: { w: number, h: number; }) {
this.canvasSize = size;
this.ratio = maxOrbit(this.canvasSize.w, this.canvasSize.h) / this.maxOrbitRadius;
if (this.ratio !== 1) {
this.maxOrbitRadius = maxOrbit(this.canvasSize.w, this.canvasSize.h);
this.orbitRadius = this.orbitRadius * this.ratio;
this.radius = this.radius * this.ratio;
this.orbitX = this.canvasSize.w / 2;
this.orbitY = this.canvasSize.h / 2;
}
}
draw() {
const x = (Math.sin(this.elapsedTime) * this.orbitRadius + this.orbitX);
const y = (Math.cos(this.elapsedTime) * this.orbitRadius + this.orbitY);
const spark = Math.random();
if (spark < 0.5 && this.alpha > 0) {
this.alpha -= 0.05;
} else if (spark > 0.5 && this.alpha < 1) {
this.alpha += 0.05;
}
this.ctx.globalAlpha = this.alpha;
this.ctx.drawImage(this.offscreenCanvas, x - this.radius / 2, y - this.radius / 2, this.radius, this.radius);
this.elapsedTime += this.speed;
}
}
const StarField = () => {
const canvasRef = useRef<HTMLCanvasElement | null>(null);
const animationRef = useRef<number | null>(null);
const [canvasSize, setCanvasSize] = useState({ w: 0, h: 0 });
const [initiated, setInitiated] = useState(false);
const [stars, setStars] = useState<Star[]>([]);
useEffect(() => {
if (canvasRef.current && canvasSize.w !== 0 && canvasSize.h !== 0 && !initiated) {
const ctx = canvasRef.current!.getContext('2d')!;
const _stars = Array.from({ length: MAX_STARS }, () => new Star(ctx, canvasSize));
setStars(_stars);
setInitiated(true);
}
}, [canvasSize.w, canvasSize.h]);
useEffect(() => {
if (canvasRef.current) {
const resizeHandler = () => {
const { clientWidth, clientHeight } = canvasRef.current!.parentElement!;
setCanvasSize({ w: clientWidth, h: clientHeight });
};
resizeHandler();
addEventListener('resize', resizeHandler);
return () => {
removeEventListener('resize', resizeHandler);
};
}
}, []);
useEffect(() => {
if (canvasRef.current) {
const ctx = canvasRef.current.getContext('2d')!;
canvasRef.current!.width = canvasSize.w;
canvasRef.current!.height = canvasSize.h;
const animation = () => {
ctx.globalCompositeOperation = 'source-over';
ctx.globalAlpha = 0.8;
ctx.fillStyle = `hsla(${HUE} , 64%, 6%, 1)`;
ctx.fillRect(0, 0, canvasSize.w, canvasSize.h);
ctx.globalCompositeOperation = 'lighter';
stars.forEach((star) => {
if (star) {
star.update(canvasSize);
star.draw();
}
});
animationRef.current = requestAnimationFrame(animation);
};
animation();
return () => {
cancelAnimationFrame(animationRef.current!);
};
}
}, [canvasSize.w, canvasSize.h, stars]);
return (
<canvas ref={canvasRef}></canvas>
);
};
export default StarField;
如果您觉得这篇文章有帮助,请点个赞吧~
相关文章
更多文章 →javascript2026-02-24
navigator.sendBeacon全指南
在前端开发中,埋点系统是必不可少的一环。我们经常需要在用户 关闭页面 、 刷新 或 跳转路由 时,向服务器发送最后一条统计数据(比如用户停留时长、页面跳出率)。 但这看似简单的需求,在实现时却危机四伏:请求发不出去?页面跳转卡顿?今天我们就来聊聊这个问题的终极解决方案 —— 。 一、 痛点与传统方案的挣扎 场景还原 当用户点击关闭按钮时,浏览器会触发生命周期事件( 或 )。如果我们直接使用普通的异步 AJAX ( 或 ) 发送请求,浏览...
学习
javascript2025-11-02
理解浏览器事件系统,从用户点击到事件对象的完整旅程
深入理解浏览器事件系统:从用户点击到事件对象的完整旅程 “当我点击页面按钮时,背后发生了什么?为什么回调函数能收到一个包含丰富信息的event对象?今天,让我们一起揭开浏览器事件系统的神秘面纱。” 一个令人困惑的现象 作为前端开发者,我们每天都在写这样的代码: 这段代码如此熟悉,以至于我们很少停下来思考: 这个 对象到底从哪里来?它为什么能知道点击的精确坐标?为什么能识别是哪个元素被点击了? 更神奇的是,当我们手动创建事件时:...
学习
javascript2025-10-01
实现大文件上传全流程详解
在日常开发中,大文件上传是个绕不开的坎——动辄几百 MB 甚至 GB 级的文件,直接上传不仅容易超时,还会让用户体验大打折扣。最近我用 Vue+Express 实现了一套完整的大文件上传方案,支持分片上传、断点续传、秒传和手动中。 一、先看效果:我们要实现什么? 先上核心功能清单,确保大家明确目标,知道我们要解决哪些实际问题: 大文件分片上传 :将文件切成固定大小的小片段分批上传,避免单次请求超时 秒传 :服务器已存在完整文件时,直接返...
学习
javascript2025-09-18
JavaScript 的多线程能力:Worker
如果你写过一些计算量稍大的 JavaScript 代码,比如图像处理、大量数据排序或者复杂的算法,你几乎肯定遇到过浏览器“卡死”的现象。点击页面没反应,动画也停了,就像整个世界都静止了。 这就是主线程被阻塞的典型后果。因为主线程既要负责执行 JavaScript,又要负责渲染页面、响应用户操作,一旦它被繁重的计算任务占满,就无暇顾及其他,用户体验便直线下降。 这个问题的根源,正是“主线程是单线程的”。那么,如何解决呢? 答案很简单:把这...
学习面试
javascript2025-09-15
一张 8K 海报差点把首屏拖垮
你给后台管理系统加了一个「企业风采」模块,运营同学一口气上传了 200 张 8K 宣传海报。首屏直接飙到 8.3 s,LCP 红得发紫。 老板一句「能不能像朋友圈那样滑到哪看到哪?」——于是你把懒加载重新翻出来折腾了一轮。 解决方案:三条技术路线,你全踩了一遍 1\. 最偷懒:原生 一行代码就能跑,浏览器帮你搞定。 🔍 关键决策点 2020 年后现代浏览器全覆盖,IE 全军覆没。 必须写死 ,否则 CLS 会抖成 PPT。 适用场景...
学习
javascript2025-09-10
🚀 Web Worker让你的应用丝滑
🌟 引言 在日常的前端开发中,你是否遇到过这样的困扰: 大数据处理时页面卡死 :处理几万条数据时,页面直接卡成PPT,用户点击毫无反应 复杂计算阻塞UI :图片处理、数据分析等计算密集型任务让整个应用假死 文件上传/下载卡顿 :大文件操作时,其他功能完全无法使用 实时数据处理性能差 :WebSocket接收大量数据时,页面渲染严重滞后 今天分享6个Web Worker的核心技巧,让你的应用告别卡顿,用户体验丝滑如德芙! 💡 核心技巧...
学习
评论
请登录后发表评论
去登录